PADI Underwater Navigation Course
Knowing where you are – underwater – and where you’re going comes in real handy, especially if you’re looking for an object or locating that beautiful reef that you heard about. If you’re a PADI Open Water Diver (PADI Junior Open Water Diver or equivalent) and at least 12, then this padi underwater navigation is for you.
During your Padi Underwater Navigation program you’ll go on three open water dives familiarizing yourself with the skills, knowledge, planning, organization, procedures, techniques, problems, hazards and enjoyment of underwater navigation.
Skills You’ll learn on this course Padi Underwater Navigation:
- Procedures and techniques for planning.
- Organizing underwater navigation and problems and hazards associated.
- Methods of estimating distances underwater.
- Natural navigation techniques.
- How to use underwater patterns.
- Dive site relocation techniques.
- Compass navigation techniques.
The elective Navigation dive conducted during your PADI Advanced Open Water Diver program may count toward this speciality at the discretion of the instructor.
To sign up for this speciality, Navigate to our contact page and ask them for the details. You can also find out more about this topic from information in the PADI Underwater Navigation Crew-Pack.
Padi Underwater Compass Navigation
Although most of us had an introduction to compass navigation underwater during our initial scuba certification course, chances are you made your first few holiday dives on a “follow the divemaster” dive plan which didn’t require a lot of self navigation. By the time you’re ready to take on more independent dive routes, you might be a little rusty. Fear not; compass navigation underwater is a piece of cake.
PARTS OF YOUR COMPASS
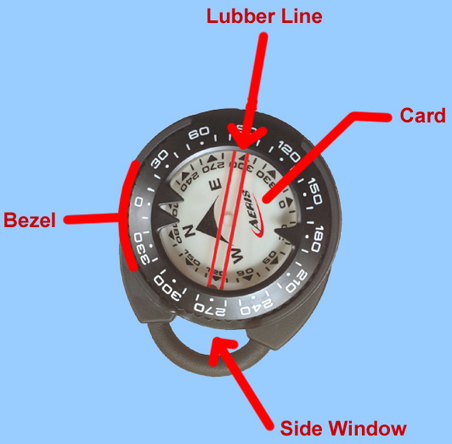
To tell you how to get the most out of your compass, we’ll need to cover a little bit of compass jargon first. The part of your scuba compass that moves and always points north is called the card. It’s usually white, with N,S,E, and W indicated, and a beveled edge with a series of mysterious numbers on it (more very soon on these). Then there should be a movable ring around the edge of the compass, usually black, called the bezel. An orange line or double line across the top of the compass is called the lubber line, and finally, there should be a little window in the side of your compass, which I have named for today the side window. That’s it!
BELT AND SUSPENDERS
The way I like to explain scuba compasses is to say that there are two easy ways to use your compass, that actually work together, although either alone will do in a pinch. Sort of like belt or suspenders. First let’s talk belt, or side-window navigation.
BELT
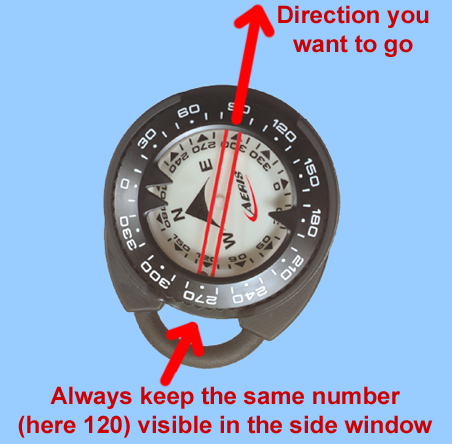
Side-window navigation couldn’t be simpler. You point the lubber line on top of your compass at where you want to go, with the side window facing you, and note the number. (Notice that the edge of the card is beveled at 45 degrees – this is so you can see the numbers on the edge both from the top and through the side window). Now as long as you hold your compass flat in front of you with the lubber line pointing in the direction you’re swimming, you should always see the same number in your window as long as you’re going the right way. If you see a different number, turn until you see the same number. This trick is the reason that the side window is at the back (closer to you) end of the lubber line on your compass! It sounds too easy but that’s really it.
Here’s a way that I use this very simple trick all the time: on shore dives, before descending, I point my compass at where I’d like to get out and look in the little side window. As long as I check my compass every so often and make sure I’m seeing the same number in the side window, I’m always swimming in toward my exit point. You might think you could do this without your compass, but I frequently get to the bottom with my buddy and try to ‘guess’ which way it is to shore before looking back at my compass, and I’m often wrong.
The downside of the side window method is that you need to remember your number, or you’re in trouble. I’ve always been lucky with this, but you can imagine that if you make several different navigation dives in the same day, you might start to get them mixed up. This brings us to…
SUSPENDERS
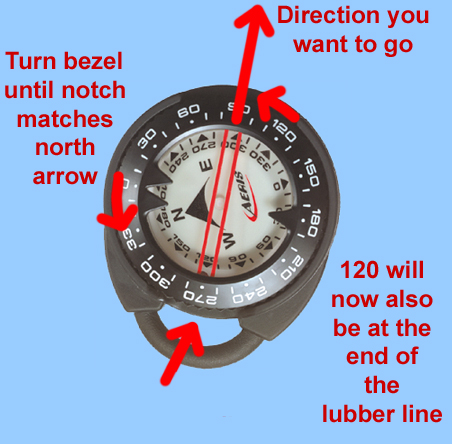
Navigating with your bezel works essentially the same as using the side window, but your bezel remembers your number for you. All you do is, point the lubber line on top of your compass at where you want to go, and then wait until the card settles down and stops moving. Then turn your bezel until the double triangle on the edge of the bezel (the notch right by the number zero on the bezel) is bracketing the north arrow on the card. Now as long as you hold your compass flat in front of you with the lubber line pointing in the direction you’re swimming, you should always see the north arrow inside the notch, as long as you’re going the right way. If not, turn until you see the north arrow inside the notch. That’s it!
Of course, if you bump your bezel underwater and move it, you’re out of luck.
COMBINING
That’s why ideally, you should turn your bezel until the notch brackets the north arrow, AND remember the number in the side window. Notice that if you’ve adjusted the bezel correctly, the number in the side window is also the number directly across from you at the front end of the lubber line. In other words, you can imagine in the picture above that if I turned the bezel counterclockwise until the notch bracketed the north arrow, the 120 on the bezel would be at the far end of the lubber line. Notice that on the card, the number showing in the side window is 120. Yep, they always go together whenever the bezel is adjusted correctly. If you were holding this compass and swimming in the direction of the lubber line, you’d be on a heading of 120.
COMMUNICATING BY NUMB3RS
Now that you’re friends with your compass, there’s a lot you can do with it. A divemaster can tell you “head down the anchor line, and head out from there at 150 to reach the reef”. When you get to the bottom of the anchor line, you simply turn yourself until you see 150 in your side window, or turn your bezel until 150 on the bezel is at the far end of the lubber line, and turn yourself until the north arrow on the card is in the notch. Then away you go to the reef. Remember, both methods point you in the same direction! I like to set the bezel as a precaution, then swim by using the side window. You may find it easier to use the top down view of your compass to stay on course.
RECIPROCAL COURSES
That’s great to get you to the reef, but how do you get back? Easy! If you’re thinking in terms of the bezel, simply turn until the north arrow faces not to the notch, but to the single triangle that’s exactly across from the notch. Now you’re pointed back where you came. Done. If you’re using the side window, take a look at the top of your compass. Note the number directly across from the heading that you’ve been on. If you look at the picture above, you can see that the number directly across from 150 is 330. So if you keep 330 in your side window on the way back from the reef, you should be headed for the anchor line. Again both methods of thinking about it will point you the correct way back.
SOME PEOPLE ACTUALLY LIKE MATH
If you have another source of info about compasses, they will tell you to “Add 180, and if this number exceeds 360, then subtract 360″ to find how to head back where you started, i.e. to plot a reciprocal course. This is in fact correct, and if it’s not obvious to you right away, you can convince yourself by staring at the top of your compass that if you use this formula on any number you’ll always get the number across from it. This is important for people who need very accurate numbers, closer together than the ones on your compass- for example they’re heading out at 243, and they need to know to return along 63. For the level of accuracy needed for a lot of recreational dive navigation, you could just head out at 240 and return at 60, which allows you to look at the top of your compass for the answer and skip the math. Similarly, right and left turns should be figured by adding or subtracting 90 from your heading (again subtracting 360 if the result is greater than 360), but if you use the numbers on the top of your compass, you can just peek to see the answer.
THE REAL TRICKS
Great job so far. Unfortunately, the really tricky part of using your compass isn’t learning what the numbers mean and how to adjust the bezel (Sorry). The most common mistakes are not holding your compass flat, and not actually swimming in the direction your lubber line is pointing.
The card in your compass is balanced on a pivot, and if the compass isn’t held completely horizontal, the card will brush against the clear top and get jammed so that it can’t rotate. If you aren’t sure, try jiggling the compass gently. If the card moves, it was probably stuck before you jiggled it, which means your compass wasn’t as horizontal as you’d hoped. For this reason also, avoid buying or renting compasses that have bubbles inside (they’re normally liquid filled with no bubbles), as bubbles can exacerbate the card-jamming problem and make your compass more finicky about how horizontal it needs to be.
Most people hold their compass in one hand or the other, and find themselves veering off in the opposite direction. That’s because they think they have the lubber line pointed directly ahead of them, when in fact it’s pointed slightly to one side. The best way to improve this is just to practice. Try different methods of holding your compass to see what works best for you. Waypoint navigation (outlined below) also helps.
WAYPOINT NAVIGATION
Now that you know how to compass navigate like a pro, does it mean you’ll have to spend all your dive time staring at your compass instead of the scenery? Of course not. The best way to get somewhere with your compass is to use waypoints. If you’re heading along 150, just hold up your compass and look at the 150 in the side window, then look directly past it to the farthest really distinct underwater landmark (a large and distinctive coral, for example). Now enjoy your dive as you make your way to the previously selected waypoint- feel free to veer a little left or right if there are things you’d like to investigate more closely or photograph, etc. When you reach your waypoint, simply start over and select a new, farther waypoint, until you reach your destination. This way you can check your compass sporadically but always stay on course.
LOGGING HEADINGS
When your divemaster told you earlier in our lesson to head out along 150 to reach the reef, you were being told a heading. Heading is the name for the number. This is great info to add to your dive log notes and include on any sketched dive site maps. A “Heading from mooring line to reef = 150″ note will come in handy if you’re back at this site again. For example, all of my shore dive site maps contain a “heading to shore” note, which tells me the heading I should use to get from where I usually descend (wherever the interesting dive features are) to where I want to exit on the shore. It’s not perfect if I move far from my descent point during the dive, but even then, it’s much better than having no idea which direction the exit point is.
DEVIATION
Finally, it might not come up often, but it bears mentioning: large iron and steel objects (like shipwrecks) can influence the magnet in your compass, causing it to point in the wrong direction. This is called deviation. If you suspect this is happening, simply move away from the object several feet, say by ascending several feet above it, and the problem should correct itself.
Coming up soon, we’ll extend our navigation skills by talking about taking bearings at the surface, as well as natural navigation.
There are a lot of good deals out there on stand-alone compasses, and some people really like being able to keep their compass separate from their other gauges. However, if you’re planning to buy your own regulator and gauges, or dive computer, soon, you may want to wait and save money by getting a set of gauges or a computer that has a compass already built in. I use a Tusa SCA-330 Platina compact 3 gauge console, which has a great built-in compass.